In practice, it's more involved. Skip a step and you risk bent columns, damaged hydraulic lines, or a voided warranty. Worse, mishandling pressurized hydraulic components or unsupported columns can cause serious injury.
This guide walks through the full disassembly sequence, the tools and manpower you'll actually need, and the mistakes that trip up most first-timers.
Key Takeaways
- Disassembly typically takes several hours and requires two or more people, not one
- Most 4-post lifts aren't bolted to the floor, but bolted units need extra anchor removal
- Drain hydraulic fluid and fully lower the lift before touching anything else
- Labeling bolts, cables, and hose connections saves hours during reassembly
- Torque specs from your owner's manual matter as much during disassembly as reassembly
When Should You Disassemble a 4-Post Car Lift?
Full teardown makes sense in a handful of situations:
- Relocating to a new garage, shop, or dealership bay
- Selling the lift to a new owner who needs it delivered disassembled
- Replacing it with a different lift system or configuration
- Major structural repairs that require taking the frame apart
Seasonal moves count too. If you're shifting a lift from an outdoor pad to an indoor space, or reconfiguring a rollaway unit, that's a legitimate reason for a full teardown even without a permanent relocation in mind.
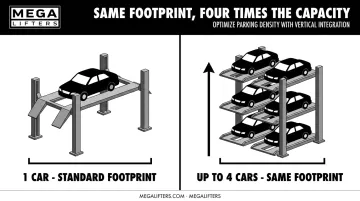
There's also a strategic angle worth considering before you start unbolting anything. If your real goal is maximizing space rather than just moving the same footprint of steel, disassembly is the natural moment to compare your lift against a stacking system instead.
A 4-post lift stores one vehicle. A custom stacker can store two, three, or four vehicles in that same bay. Megalifters designs and installs custom automobile stackers in double, triple, and quad configurations for exactly this scenario. It's worth a quick evaluation before you reinstall the old unit somewhere new.
What You Need Before Disassembling a 4-Post Car Lift
Rushing into disassembly without the right setup is how projects stall halfway through — usually with a column half-detached and no clear next step. Get everything staged first.
Tools & Equipment Checklist
You'll want the following on hand before you start:
- Socket and wrench sets (metric and standard, depending on your model)
- Impact wrench for stubborn or corroded fasteners
- Floor jack and jack stands for supporting components mid-disassembly
- Wheel chocks
- Hydraulic fluid drain pan (approved container, not a random bucket)
- Your owner's manual, specifically for torque specs and hose routing diagrams
Manufacturer manuals for heavier-duty four-post lifts often call out additional equipment: a rotary hammer for anchor removal, and a forklift or shop crane if you're handling long column sections without help.
Manpower & Safety Gear
Plan for two people minimum. Columns and crossbeams often weigh 150 pounds or more, and one person needs to support that weight while the other removes fasteners. Skipping this step risks dropped components or crushed fingers.
Assign roles before you start: decide who supports the weight and who pulls fasteners, so nobody's guessing mid-lift.
Safety gear should include:
- Hard hats
- Work gloves
- Steel-toe boots
- Eye protection
This gear reduces the risk of cuts, drops, and impact injuries during teardown.
Site Preparation
Clear the work area completely before you touch a bolt. Check ceiling clearance for column removal, especially in garages with lower headroom or overhead storage. Decide in advance where components will sit once removed and how they'll get transported: a pallet, dolly, or moving truck bed, depending on distance.
Step-by-Step Guide to Disassembling a 4-Post Car Lift
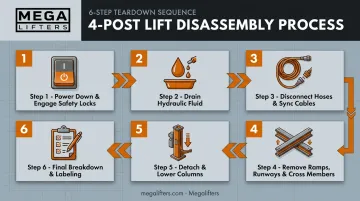
Following this sequence in order matters. Skipping ahead, like disconnecting cables before draining hydraulic fluid, is how hoses get damaged and lines end up leaking pressurized fluid where you don't want it.
Step 1: Prepare and Power Down the Lift
Confirm the lift is empty and fully lowered to the ground. Then:
- Disconnect electrical power by shutting off the breaker or unplugging the unit entirely
- Engage all safety locks before any physical disconnection begins
Rotary's dismantling procedure for its 4-post models follows this exact order: switch off the main power, disconnect the mains fuse, then post a warning sign against reconnection before any mechanical work starts.
Step 2: Drain the Hydraulic Fluid
Locate the hydraulic power unit's reservoir and drain the fluid into your approved container. This step is not optional. Hydraulic components on these lifts can hold residual pressure up to 200 bar, and Rotary's own service documentation warns of a risk of fatal injury from incorrectly disassembling pressurized hydraulic components.
Check for residual pressure in the lines before disconnecting anything, and dispose of the drained fluid according to your local environmental regulations. Rules vary by state, so don't assume your neighbor's disposal method applies to you.
Step 3: Disconnect Hydraulic Lines and Cables
Detach hydraulic hoses from the cylinder and power unit. Cap every open end immediately. This keeps leftover fluid from dripping out and stops debris from getting into the lines.
Next, loosen and remove the synchronization cables connecting the four posts. Take a photo of the routing before you pull anything loose. Reassembly gets a lot harder when you're guessing which cable ran where.
Step 4: Remove Ramps, Runways, and Cross Members
This is a two-person step, full stop. One person supports the weight of the ramp or runway while the other removes the fasteners. Trying to do this alone means either dropping a heavy component or improvising a support that isn't rated for the job.
Once ramps and runways are clear, detach the cross members connecting the front and rear column pairs.
Step 5: Detach and Lower the Columns
If your lift is bolted down, remove the anchor bolts now. BendPak's installation documentation for its HD-9 series notes that anchoring isn't strictly required but is strongly recommended for stability, and becomes mandatory if a rolling bridge jack accessory is installed. Check your specific model before assuming either way.
With anchors clear, walk or crane each column away from its footprint. Keep columns upright throughout. Laying them flat or dragging them at an angle is a fast way to bend the frame.
Step 6: Final Breakdown and Component Organization
Separate remaining hardware and label everything, including bolts, brackets, and cables, by the location it came from. Photograph every connection point you're unsure about.
Load components onto a dolly, pallet, or moving equipment sized for their actual weight and length. Columns are longer and heavier than they look on a spec sheet; don't improvise here.
Common Mistakes to Avoid When Disassembling a 4-Post Car Lift
Most disassembly problems trace back to one of these four issues:
- Skipping the hydraulic fluid drain: this risks spills and, in worse cases, injury from pressurized line discharge
- Attempting column removal solo: a dropped column can bend on impact or injure whoever's underneath it
- Not labeling cables, bolts, or hose connections: this turns reassembly into hours of guesswork later
- Ignoring manufacturer torque specs: both during removal and, more critically, during reinstallation
That last point deserves emphasis. Under-torquing a bolt during reassembly might not fail immediately, but it creates a structural weak point that shows up months later, usually at the worst possible time.
DIY Disassembly vs. Hiring Professional Help
DIY disassembly is realistic for straightforward, non-bolted lifts if you've got two capable people, a few hours, and basic hand tools. Professional help meaningfully reduces risk when any of these apply:
- Bolted-down lift secured to a concrete pad or slab
- Visible rust or corrosion on hoses, fittings, or anchor bolts
- No second person available to help manage the heavy columns
There's a separate question worth asking before you disassemble at all: are you relocating the same lift, or is this the moment to upgrade?
If the goal is squeezing more parking out of the same footprint, reassembling the old 4-post lift somewhere new might not be the best use of the space. That's a common motivator for dealerships and residential garages alike.
Megalifters, based in Wayne, Michigan, designs and installs custom automobile stackers built around this exact decision point. Their lineup spans single-car 4-post lifts to quad stackers, with options for integrated EV charging for owners who want parking density and charging infrastructure in one system.

It's a different project than reassembling what you already have, but for anyone weighing "move it" against "upgrade it," it's worth a conversation before the old lift goes back together.
Frequently Asked Questions
Does a 4-post lift have to be bolted down?
No. Most 4-post lifts don't require bolting to the floor, which makes relocation and disassembly simpler. Bolted units just need anchor removal as an added step before the columns come free.
How hard is it to remove a lift?
It's moderately labor-intensive — plan on two or more people spending several hours with basic hand tools. Most residential units don't require specialized equipment, though heavier commercial lifts may.
How long does it take to disassemble a 4-post car lift?
A few hours with two people is typical. Corroded hydraulic lines or stuck anchor bolts can add significant time, so build in buffer if your lift has been in place for years.
Can one person disassemble a 4-post lift alone?
It's not recommended. Columns and crossbeams are heavy enough that a solo attempt risks dropped components and real injury. OSHA notes there's no lift-specific standard for users, but general safe-handling practices still apply.
Do I need to drain the hydraulic fluid before disassembly?
Yes, always. Draining fluid first prevents spills and reduces pressurized-line hazards, and it keeps contamination out of the transport vehicle.
What's the best way to move a 4-post lift after disassembly?
Use a dolly, pallet jack, or moving truck sized for the weight of your columns and crossbeams. Keep all loose hardware in labeled containers so reassembly doesn't turn into a guessing game.