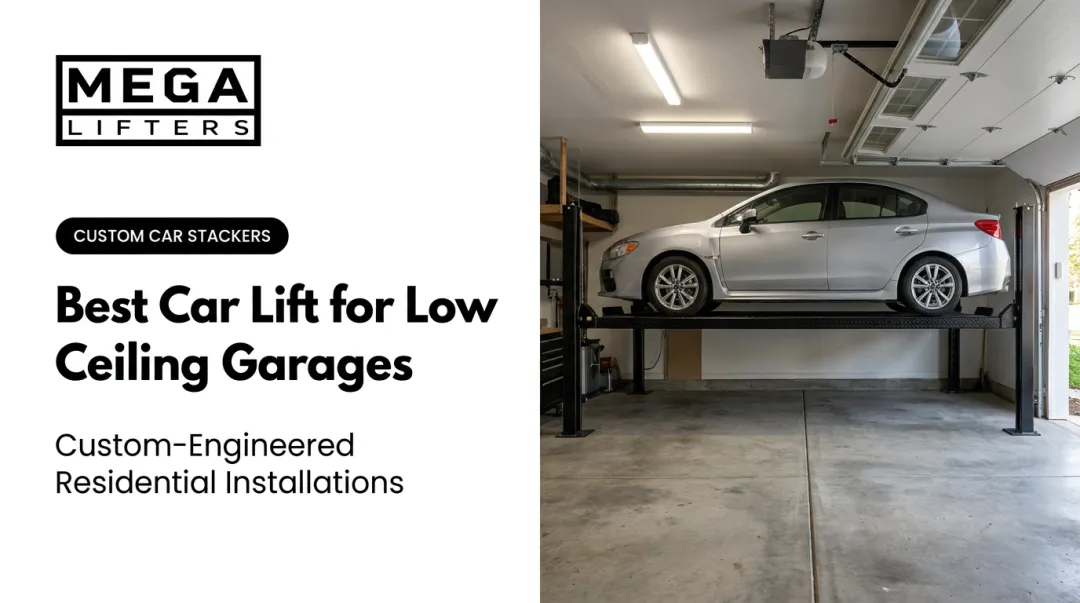
Every inch matters when clearance for the vehicle, the lift structure, and overhead obstructions all compete for the same tight space. Many owners still install 4 post lifts themselves with a helper, but low-clearance garages demand precise pre-measurement, and sometimes a specialist, to avoid an expensive mistake.
Skip the planning, and here's what typically happens: the vehicle can't clear the ceiling at full rise, the garage door track collides with the lift, an inspection fails, or you end up with a lift you simply can't use at its intended height.
This guide walks through the full process, from measuring clearance to final validation, so your low-ceiling install works the first time.
Key Takeaways
- Account for lift rise, vehicle height, and a safety margin—not just platform height.
- Low-profile 4 post lifts run 6'9" to 7'5" overall, fitting most 8-9 ft garages.
- Garage door tracks, openers, and ductwork cause most low-ceiling install failures.
- Installation follows measure, position, sync, validate—don't rush any step.
- Custom stacking builders can engineer around spaces standard lifts can't fit.
Prerequisites and Safety Considerations
Before you buy a lift or pick up a wrench, run the numbers. This single calculation determines whether a standard 4 post lift will work in your garage at all.
Calculate Your Clearance
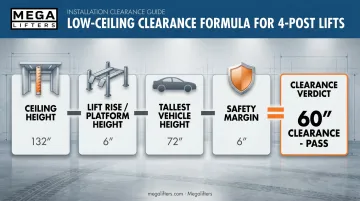
The formula is straightforward:
Ceiling height − lift's platform/rise height − tallest vehicle height − safety margin = your clearance verdict
Manufacturer guidance varies by model rather than following one universal rule. Dannmar's D4-9 installation manual uses a rough estimate of 88 inches plus your tallest vehicle's height.
Your specific lift's manual is the final word, not a generic industry number. It also flags ceiling obstructions unique to that model, a check worth repeating on your own (more on that below).
If that math doesn't leave comfortable headroom above the vehicle at your intended lift height, even at a partial rise setting, stop. Don't proceed until you've resolved it, whether that means a different model or a specialist consultation.
Floor and Electrical Requirements
Your slab needs to handle the load. As a planning benchmark, BendPak's HD-9 series manual requires a minimum 4.25-inch slab at 3,000 PSI, cured at least 28 days, though your exact model's requirement may differ.
- Confirm the slab is level, crack-free, and free of expansion joints under the footprint
- Verify electrical specs with the lift manual (published examples range from 110V/20A to 220V/25A)
- Use a dedicated circuit for the hydraulic power unit
- Have a licensed electrician confirm wiring if you're not certain
Overhead Obstruction Checks
Walk the entire footprint and note everything hanging from the ceiling:
- Garage door tracks and torsion springs
- Door openers and their rail path
- HVAC ducts and vents
- Sprinkler heads
- Light fixtures and hanging storage
Any of these can intrude into the lift's operating envelope even when raw ceiling height looks sufficient on paper.
Tools and Parts Required
Most 4 post lift kits ship with the core structural components:
- Four columns/uprights and matching runways
- Crossbeams and connecting hardware
- Hydraulic power unit
- Synchronization cables or chains
- Safety locks and mounting hardware
You'll also need a basic tool set:
- Sockets, wrenches, and a torque wrench
- A 4-6 ft level and a tape measure
- A way to move heavy components (engine hoist, extra hands, or a forklift)
Some owners add a caster kit for portability or ramps for easier drive-on access. These are accessories, not substitutes for the core structural components your lift needs to function safely—especially in a low-ceiling garage, where a custom-built system like Megalifters' accounts for clearance from the start.
How to Install a 4 Post Lift in a Low Ceiling Garage (Step-by-Step)
Expect a two-person crew, basic mechanical tools, and roughly a full day to a day and a half for a standard install. Low-ceiling jobs run longer because of the extra measuring, test-fitting, and adjustment required.
Skipping the measurement and dry-fit steps is the single biggest cause of failed low-ceiling installs.
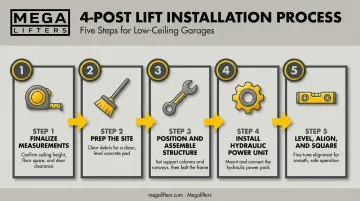
- Finalize your garage measurements. Check ceiling height at every point in the footprint, since sloped ceilings and beams vary the number. Mark every obstruction point and confirm your lift's height fits your clearance formula.
- Prep the site. Clear the footprint completely, run a long level across the intended runway positions to confirm the floor is flat, and mark column and runway placement based on your vehicle's track width.
- Position and assemble the structure. Stand up the four columns and runways, then connect crossbeams to manufacturer torque specs. In low-ceiling spaces, position the structure's tallest point as far from ceiling obstructions as possible.
- Install the hydraulic power unit. Connect synchronization cables or chains between all four columns. This is what keeps the lift rising evenly on every corner.
- Level, align, and square everything. Install safety locks and ramps, then confirm the structure is square before any load testing begins.
Doing each step correctly matters more than doing it fast. Misalignment discovered after full assembly is far harder to correct in tight quarters than a problem caught mid-install.
Post-Installation Checks and Validation
Validation confirms the lift is actually safe to use, not just assembled. Skipping this step is exactly why some low-ceiling installs only reveal a clearance problem after a vehicle is already parked overhead, which means expensive rework.
Run through this checklist before anyone drives a vehicle onto the lift:
- Structural check: all bolts torqued to spec, columns plumb, cables or chains showing even tension across all four corners
- Empty-load test: cycle the lift through its full range several times, watching closely for uneven rise between corners
- Clearance check: measure the actual gap to the ceiling at maximum working height and confirm it meets or exceeds your planned safety margin
- Safety lock test: engage the locks at several height positions and confirm they hold before ever loading a vehicle
Looks fine and measures fine are two different things. Don't skip this checklist just because the install looks solid.
Common Installation Problems and Fixes
Low ceilings create a specific set of problems you won't see in a standard-height garage.
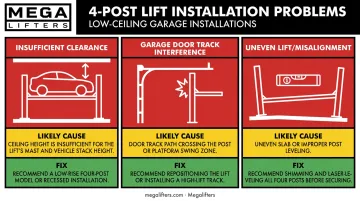
Insufficient Overhead Clearance Discovered After Install
The problem: the raised vehicle or the lift structure sits too close to the ceiling for safe, comfortable use.
Likely cause: clearance was calculated using an estimated vehicle height instead of an actual measurement, or the safety margin got skipped entirely.
Fix: if your lift has adjustable stop heights, use a lower rise setting first. Most manufacturers recommend at least 4-6 inches of clearance above the vehicle's height at full rise. If that's still not enough room, a specialist like Megalifters can design a reduced-height solution built for your exact ceiling.
Garage Door Track Interference
The problem: the garage door track or opener rail collides with the lift columns or a fully raised vehicle.
Likely cause: nobody checked the door track position against the lift's footprint before installation began.
Fix: standard tracks curve from vertical to horizontal and then run parallel to the ceiling, eating into the exact space a raised vehicle needs. A high-lift track configuration continues farther up the wall before turning, which frees up vertical space, though results vary depending on your garage's layout. Repositioning the lift within the garage is sometimes the simpler answer.
Uneven Lift or Runway Misalignment
The problem: one or more corners rise faster or slower than the rest.
Likely cause: an unlevel floor slab, or synchronization cables/chains that aren't tensioned correctly.
Fix: shim the affected column base and re-adjust cable or chain tension to manufacturer spec.
Pro Tips for Installing a 4 Post Lift Effectively in Low Ceiling Garages
A few habits separate a smooth low-ceiling install from a frustrating one:
- Measure your tallest vehicle, not your average one. Include roof racks and antennas; underestimating this height is the most common planning mistake.
- Choose a certified low-profile model built for reduced height. Standard lifts can't be adjusted to fit a short garage, so look for units engineered specifically for this problem.
- Document everything. Photos plus a manufacturer or professional sign-off protect your warranty and make future inspections far easier.
- Know when to call a specialist. Near-minimum ceilings, irregular layouts, or a desire for built-in EV charging often call for a custom solution rather than an off-the-shelf lift.
That last point is where a company like Megalifters comes in. Rather than forcing a standard-height product into a space it wasn't designed for, Megalifters designs, builds, and installs custom stacking units around your actual ceiling height, floor width, and obstructions.
For garages with height but not width, a 4 post configuration works. For garages with width but not height, their Double Wide Car Lift is often the more practical answer. Every unit is sized to the specific bay, not the other way around.
Conclusion
In a low-ceiling garage, installation precision is the difference between a lift that's safe and usable and one that becomes an expensive shelf. Measure carefully, follow the installation sequence without shortcuts, and validate thoroughly before you ever park a vehicle overhead.
If you've run the numbers and a standard 4 post lift doesn't fit, you still have options. Custom builders like Megalifters can engineer around the exact clearance you have, maximizing vertical space in ways an off-the-shelf lift simply can't.
Frequently Asked Questions
What is the minimum ceiling height for a 4 post lift?
It depends on the lift's rise height, your tallest vehicle, and a safety margin, not a single fixed number. Certified low-profile models often work in garages as low as 8-9 ft, though exact figures vary by manufacturer and model.
Can a 4 post lift be installed without bolting it to the floor?
Many 4 post lifts are freestanding by design since vehicle weight distributes across the runways. You still need a level, structurally sound floor, and some models or local jurisdictions still recommend anchoring.
How much clearance do I need above a vehicle parked on a 4 post lift?
Beyond the vehicle's physical height, add 3 to 6 inches of safety margin above its tallest point when raised. Factor this in separately from your raw ceiling-to-vehicle measurement, not as part of it.
Do I need a permit to install a 4 post lift in my home garage?
Requirements vary by city and county, and whether electrical work is involved often triggers additional review. Check your local building codes before installation begins.
Can one person install a 4 post lift on their own?
Some steps are manageable solo, but most manufacturers recommend at least two people due to the weight of the columns, runways, and crossbeams, especially in tight, low-ceiling quarters.
Will installing a 4 post lift affect my garage door operation?
It can. Door tracks and openers sometimes interfere with lift columns or a raised vehicle. Check track position carefully, and be prepared to modify it before installing in a low-ceiling garage.